Healthy: Green Smoothie 30 Day Challenge

I’m on a mission for more energy. Work is super hectic at the minute and sometimes I get to the weekend and just collapse in a heap, instead of really enjoying it. I’ve been taking Berocca vitamins (mix of B12 and Vit C), which has helped but I’ve decided to step it up by having a smoothie every day in the morning and seeing if that helps as well.

There’s an awful lot of articles and online chat about raw food and green smoothies, it can be really confusing. At the minute, I’m not sticking to any particular recipe every day, just throwing a bunch of fruit and veg together. Today’s consisted of: spinach, blueberries, banana and parsley. I’ve got spirulina as well, which I’ll probably add tomorrow but bear in mind it’s got a very strong, not altogether pleasant flavour and some people can’t stomach it at all.

So, day one! I’ll report back with progress this time next week! xxx


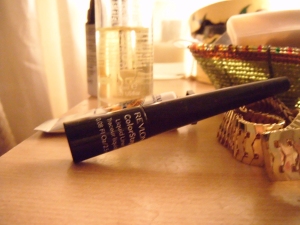
Product Review: Revlon Colorstay Liquid Liner

DSCF0138

I’m perennially on a quest to find the perfect black eyeliner – you know the one: easy to apply, doesn’t go patchy or flaky after a couple of hours, black enough to make the required dramatic impact. I know I’m not alone in this, so thought I’d write up what I’ve been slapping on recently.

I’ve been using this Revlon one for a few months now and as much as I like it, I know it’s not the absolute one, the search will continue! This is a good, affordable, option for everyday though,  with much to recommend it. The applicator can be a little tricky, depending on how steady your hands are. I find the quality of my application varies day to day; I’m usually ok but if I make the mistake of trying to rush it ends up smudged all over the place or the lines just don’t match up. Certainly pen-style applicators are easier to use although I find them usually a bit weak in the colour dept.

My favourite thing is the consistency and depth of colour of the liner itself – a really rich black, gives a great retro feel to cats eye flicks. I’m going to switch it up next time I’m buying eyeliner – any recommendations, please leave them in the comments!

xxxxx

Natural Beauty Review – Overnight Coconut Oil Hair Treatment

So this one I’ve been considering for a while. If you believe what you read on the internet, coconut oil is the answer to all your prayers – a natural, fairly inexpensive cure all for skin and hair issues.

For me especially, my hair is exactly the type that responds really well to oil treatments – thick, tends to dryness and can be quite porous. I’m an up-selling hairdresser’s dream and it took me years to catch on. I’d no sooner sit down in the chair and they were lecturing me on the condition of my hair – variations of ‘what have you been DOING to it?’, like I was sticking it on the ironing board every night –  and foisting the (usually quite expensive and only averagely effective) conditioning treatments on me. It took years, genuinely years, before I learned to say: “actually, that’s just my hair type, it tends to get a bit dry” and I would actually manage to leave the salon without spending an extra 40 quid on hair products.

So there’s lots of tutorials out there on the web for coconut oil hair; the process is a little time consuming but fairly simple. These are the steps I followed:

1. Buy some coconut oil, either online (Amazon has a pretty good selection) or in most health shops. Just look for the words “Organic and Extra Virgin”

2. Brush through your hair then warm your oil, which comes in a solid form. I put it in the microwave this time but next time I’m just going to use my hands and see how that goes.

3. When applying the oil, I’ve seen some articles that state you should do this over the sink in your bathroom, as it’s going to get messy but actually I didn’t find that so much. I just put a couple of old towels down on my bedroom floor and watched the Cavallari-era Hills  on my laptop so I could put the oil on and marvel at Brody Jenner’s face at the same time.

4. Work through your hair from roots to ends. If you’re using the oil in it’s semi-solid state, your hands are fine. If it’s liquid, saturate a wash cloth or a corner of a towel and use that.

5. Once your hair is covered, pop on a shower cap, put a towel over your pillow and go to bed to dream sweet shiny haired dreams.

6. In the morning, you’ll need to spend a bit longer in the shower to make sure your hair’s properly rinsed, shampoo twice and leave off the conditioner as it’ll weigh your hair down.

7. Style as normal and marvel at your softer & shinier hair!

My results? Not quite the miracle I was led to believe it would be, although I could see and feel a definite difference in my hair – smoother, softer and a lot less frizz. I’m going to continue to use coconut oil on a regular basis although I found the overnight treatment a little bit of a faff, to be honest so I’m going to try an express version next time round.
Product Review : OPI Big Apple Red

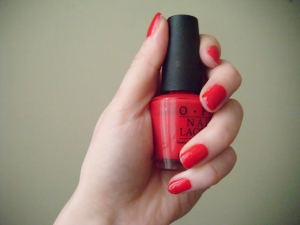
OPI Big Apple Red

In the past ten years of painting my nails crazy colours and patterns, I don’t think I’ve ever spent more than six pounds on a nail polish so I was reluctant at first to give OPI a go, even though I loved the packaging and the quirky names they give their shades. However, the never ending chipping of the cheaper brands I was using was really becoming wearing so thought I’d give it a whirl.

I went for a classic red as this is what I probably wear the most. Mine cost 11 pounds (I have no pound sign on this silly Australian keyboard, sorry!) from Beauty Bay, who also do free international delivery.

Big Apple Red is a great shade, tending neither too far towards orange or blue undertones. The polish goes on opaque, and has a shiny finish. I usually get about five days of wear, sometimes needing to top up a little on the tips although that may be because my nails tend to flake there (anyone know how to stop this by the way? Tell me in the comments if you do!)

I bought this in January and it’s still going strong. No hint of the polish starting to thicken and I’ve got some cheaper brands that I bought around the same time that look glue like by now.

Overall, definitely recommended! A slightly higher price product that’s worth the cash. I’ll still buy cheaper polishes when I want to paint little cat faces (or something) on my nails but for quality, it’s got to be OPI.